Content
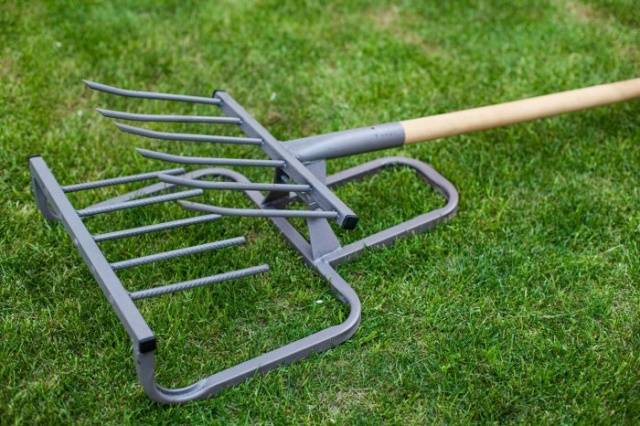
Craftsmen have come up with many different hand tools to simplify work in the garden. One of them is miracle shovel A mole consisting of two opposing pitchforks. The working part is movable and the handle is attached to it. Loosening of the soil occurs while pressing the handle of the shovel from top to bottom. In this case, the entire load falls not on the worker’s back, but on his arms.
Let's get acquainted with the design of the Mole
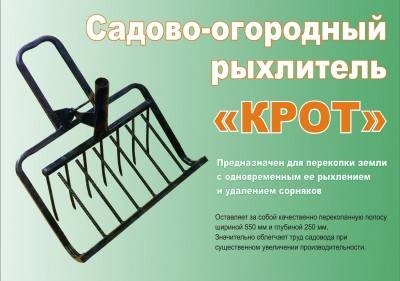
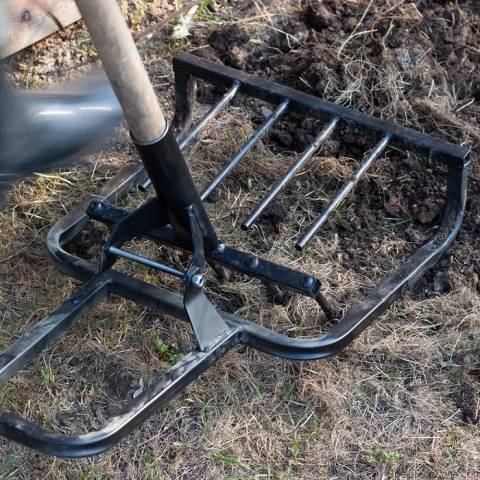
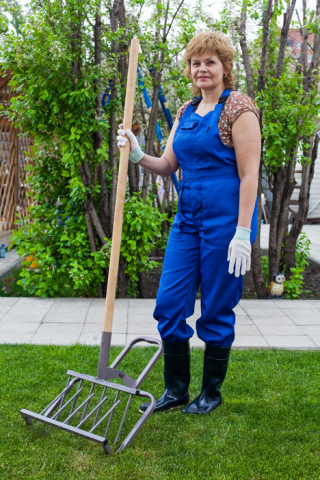
If you examine the appearance of the tool, the ripper shovel resembles wide forks bolted to the frame. The moving part is the working forks. They always have 1 pin more than the number of teeth on the frame. Usually there are 5 pins on the fixed frame, and 6 on the working element, but there may be a different number. The teeth are located opposite each other and when lifting the working part they meet.
A footrest is attached to the back of the frame. It is made in the shape of an arc and resembles the letter P, only upside down. The front of the stationary frame is slightly raised. It also serves as a support for the shovel. The teeth of the working forks are at least 25 cm long. They are made of hardened steel. In general, the number of teeth depends on the size of the miracle shovel. In the store version, the tool is found in widths from 35 to 50 cm, but no more than that.
Despite such a mass, working with the Mole miracle shovel is easy. After all, a person will not have to carry it around the garden. The tool is simply dragged to a new place, where further loosening is performed.
Many craftsmen are accustomed to doing everything with their own hands. The Mole miracle shovel is easy to weld. This does not require complex diagrams or drawing skills. You just need to find a square tube for the frame and steel rods from which the teeth will be made, and the handle can be removed from another shovel or bought a new one.
Watch the video to see the process of assembling the miracle shovel:
Why is a Mole better than a regular shovel?
Reviews about the miracle shovel Mole are different. Some people like the tool, while others criticize it. Let's figure out why this invention is better than a bayonet shovel. Let's start with fatigue during work. Firstly, to stick a bayonet shovel into the ground you need to apply a lot of force with your foot. Secondly, a person needs to bend down, pick up the tool with a lump of earth and turn it over. These actions affect not only the arms and legs, but also the back, abdominal muscles and hip joint. After several hours of work, a bent man leaves the garden, feeling terrible pain in his back.
When working with a Mole, the load falls only on your hands, since you do not need to lift the top of the clod of earth, but only need to press the handle of the tool down. There is practically no load on the legs. The teeth of a fork penetrate the ground more easily than the bayonet of a regular shovel.There are often even reviews from older people who talk about the ease of use of the tool.
The second positive point is related to the number of actions performed when cultivating the land. Let's start by digging up the entire area with a bayonet shovel. Large clods remain on clay and damp soil, which must be constantly broken up with a bayonet during the work process. After digging, the soil begins to be leveled with a rake. This action is aimed at loosening small clods of earth. The miracle shovel Mole performs all of the above actions at once. When a clod of earth passes through the tine ripper, the tool leaves behind a completely prepared bed for planting garden crops.
There are areas where the use of a miracle shovel is impossible. This includes virgin lands heavily overgrown with wheatgrass. Here you will first have to walk around with a bayonet shovel or walk-behind tractor, and then you can use the Mole. On rocky ground, you will generally have to abandon the miracle shovel. On clayey, hard soil, it will be even harder to work with a Mole than with a bayonet tool.
Guide to using Mole
The mole is not the only version of the miracle shovel. There is a tool called Plowman, Tornado, etc. The design of all these shovels has minor differences, but the operating principle is the same.
The miracle tool works on the principle of a lever. First, the shovel is placed in the area that is intended for digging. In this case, the lever, which serves as the handle, is raised to a vertical position. The teeth of the working forks also become perpendicular to the ground and sink into the ground under the weight of the frame.The depth of self-immersion depends on the density of the soil. If the teeth have partially entered the ground, the worker presses his foot on the back stop or metal bar of the working forks, where the pins are secured.
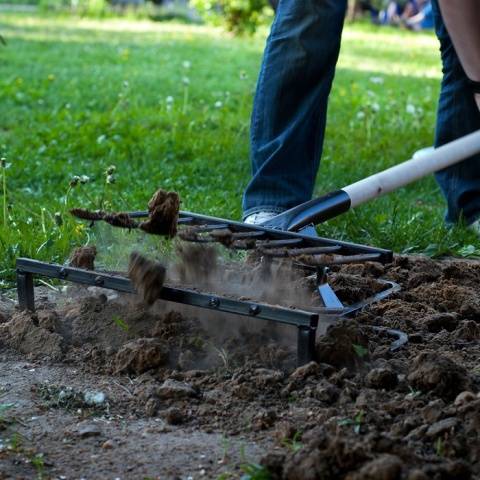
The next action is to press the handle with your hands, first towards yourself and then down. Due to the stops, the Mole frame does not load, and the working forks lift the layer of earth, pushing it through the counter teeth of the ripper. Next, the tool is simply pulled back along the bed, after which they continue to repeat similar actions.
During loosening, the weed roots are completely removed from the soil. They remain intact and also completely cleared of soil. A person can only collect them in a bucket. The big advantage of the Mole is that all the fertile soil does not go down, as happens when turning the earth over with a bayonet shovel. The soil simply loosens, remaining in its place.
Pros and cons of using Mole
The practical application of the tool revealed many positive and negative aspects. This all reflects reviews from real users. Let's first take a look at the pros:
- Working as a Mole speeds up digging up the garden. In 1 hour you can process an area of up to 2 acres with minimal fatigue.
- The tool does not require refilling or consumables, as is the case with a walk-behind tractor. For storage, it is enough to allocate a small corner in the barn.
- The mole causes less harm to the health of a working person, since the load on the musculoskeletal system is minimal.
- During loosening, the fertile layer of soil is preserved. In this case, the roots of even weeds invisible on the surface are extracted.
Among the negative aspects, one can highlight the impossibility of using the Mole in low greenhouses, as well as for loosening narrow beds, if the width of the working part of the tool exceeds the dimensions of the strip being processed.
Making your own Mole
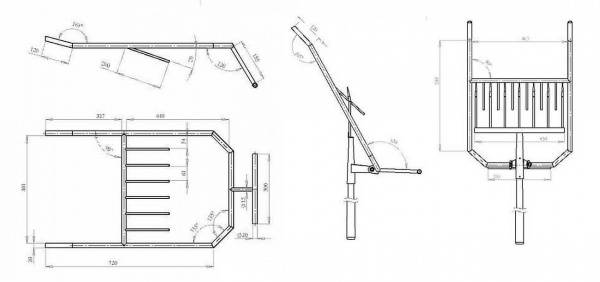
To weld such a structure, you don’t even need a drawing. You can use a visual example, and choose the sizes according to your own preferences. For those who accept work only using technically competent documents, we suggest looking at the photo for a drawing with the dimensions of the miracle shovel.
The presented scheme is more suitable for the Plowman or Tornado model, where the main difference is the shape of the rear and front stops.
So, to make the frame and stops of the structure you need to use a square metal tube. The teeth of the moving forks are made of hardened steel. One edge is sharpened with a grinder at an angle of 15–30O. A pipe jumper is welded onto the stationary frame, and the teeth of the counter forks are attached to it. These pins can be made from rebar, and there is no need to sharpen the edges. The two parts of the forks are connected by a hinge mechanism. It is made from steel strip. To do this, bend two arcs, drill holes, and then connect the parts with a bolt.
A piece of round pipe is welded to the movable fork bar. A handle from a simple shovel is inserted into the nest. For ease of use, a T-bar can be attached to the top of the handle. The height of the stalk should reach the chin.
The finished design needs to be tested. If it is comfortable to work with, it means you got the size right.
Reviews
Now let's take a look at user reviews about this tool.
