Content
Any gardener wants to get an early harvest of vegetables. Such results can only be achieved with the installation of a greenhouse. However, not every vegetable grower is able to afford the high costs. It is easier to make a greenhouse by stretching a transparent film over the arcs, but such a primitive design is not capable of providing garden plants with the proper microclimate. The best results showed high warm beds, allowing you to harvest vegetables 3 weeks faster.
Advantages of using technology
To figure out whether it’s worth making warm beds on your site, let’s look at the advantages of this method of growing early vegetables:
- The warm bed is located above ground level. This is a big plus when growing vegetables in regions with cold climates and frequent rainfall. Firstly, the soil inside the bed warms up faster. If there are still frozen areas in the garden in the shade, then on the hill the fertile soil is ready to accept seedlings. Secondly, in a rainy summer, plants on a hill will not get wet 100%.
- When creating warm beds, organic matter is used. Its decay releases heat and nutrients for plants. The process lasts at least 5 years, and during this time early vegetables can be grown.In the future, the fertile soil does not lose its nutrients and is used to grow other plants, and new layers are poured inside the fence.
- Organic matter has a positive quality - it retains moisture well. If an ordinary earthen embankment in a fence needs to be watered more often, then a warm analogue requires watering 1-2 times a week. Using drip irrigation gardening becomes twice as easy.
- During the decay of organic matter, a large amount of heat is released, which has a positive effect on the rapid germination of seeds. The plant emerging from the grain immediately receives nutrients from the compost.
- The technology allows you to obtain ready-made compost without creating a separate pile. Organic matter is stacked in layers inside the enclosure, so the warm beds are immediately ready for use in the spring.
- You can set up a warm bed outdoors or inside a greenhouse. The location does not affect the yield. Only if the garden bed is set up outside, additional arcs are installed above it and a film is stretched.
- The technology is convenient for the gardener in terms of growing vegetables. The soil covered with mulch during rain or watering does not splash with drops of water, contaminating the fruits. Few weeds grow between cultivated plants, and they are easy to pull out from loose soil.
If you like the arguments for the advantages of the technology, then in the spring you can try to plant the first set of plants in a warm bed with your own hands.
Proper placement of organic layers
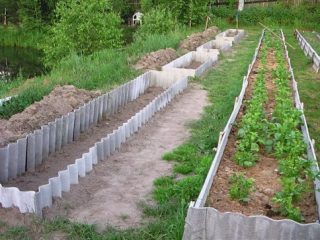
The question of how to make a warm bed in the spring is not entirely correct, since its contents begin to be prepared in the fall. But if you didn’t have time to fuss in time, this work can be done in the spring, but organic matter is more difficult to find. Depending on the depth of groundwater, the type of structure is chosen. In arid lands, warm beds are immersed in the ground. They turn out flush with the ground or slightly raised. On land plots with high groundwater levels, high, warm beds are made. In any case, a prerequisite for the correct production of a bed is its fencing. Any building material is suitable for the manufacture of sides. Most often, slate or boards are used.
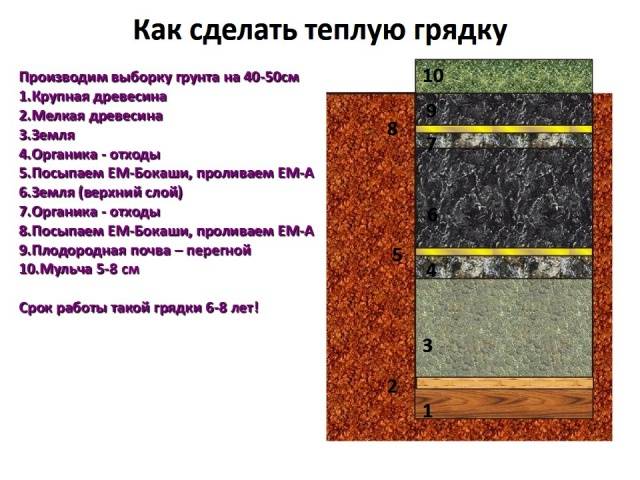
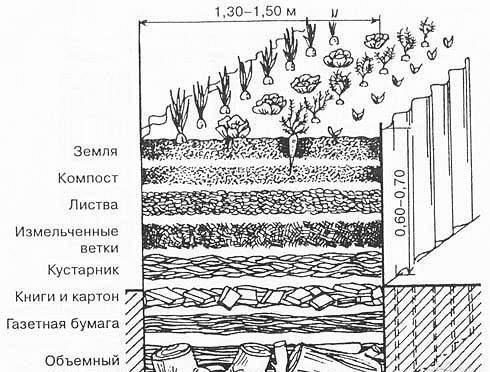
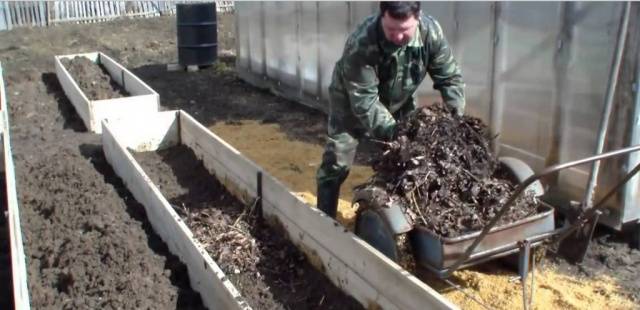
An important question remains after building a warm bed with your own hands, what to put first on its bottom, as well as what is the further order of layers. To make good compost, there is a rule for the order in which organic matter is laid. The photo shows the correct layer scheme, but it is quite complex. Most often, gardeners lay the following layers:
- The bottom of the pit is covered with large organic matter, that is, thick wood. You can use uprooted stumps, branches, in general, anything wooden that is unnecessary on the farm. Wood perfectly retains moisture inside the compost heap. The more organic matter used for the bottom layer, the more years the warm bed will last.
- The second layer is laid with fine organic matter. Stems of garden plants, thin branches of bushes, paper, leaves fallen from trees, grass, straw, etc. are suitable for these purposes.
- The third layer is a stimulator of the decomposition process of organic matter.Typically, manure or unripe compost is used for these purposes. Cut layers of turf along with grass are laid on top, only with the roots facing up. The last top layer is covered with ready-made compost.
Each layer of the warm bed is moistened with water. Air between the elements of large organic matter and moisture will accelerate the process of rotting and increase the temperature inside the bed. Some vegetable growers water the warm bed with biologically active preparations to speed up the formation of compost.
The video shows filling a warm bed:
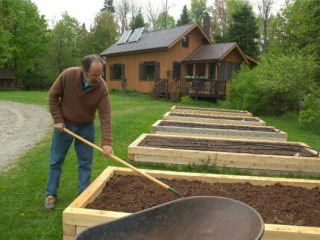
Making your own warm bed
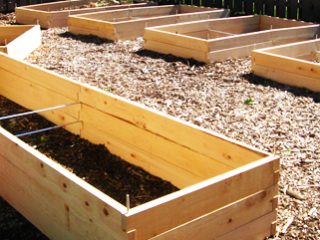
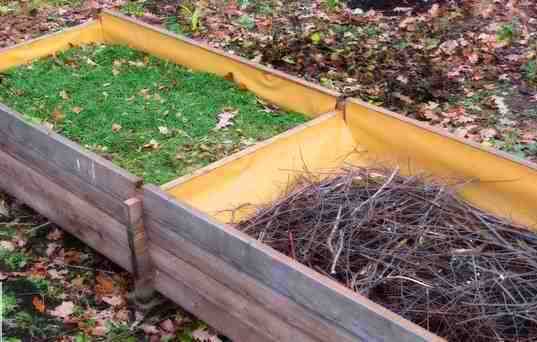
Now we will look at the step-by-step production of a warm bed with our own hands using the example of a wooden box. Wood is not the best material for sideboards in terms of long-term use, but it is an environmentally friendly material.
So, let's see how the manufacturing process works correctly:
- It’s important to decide on the size right away. You can take any length that the site or greenhouse allows. It is advisable to take the width no more than 1 m, maximum 1.2 m. Otherwise, it will be difficult to care for the crops. The depth of the hole depends on the level of groundwater and the composition of the soil. Usually a layer of fertile soil 40–60 cm thick is removed. The height of the sides is made to a maximum of 70 cm.
- According to the size of the future warm beds made of boards shoot down box. The structure is installed on the ground and markings for the pit are made along the contour on the outside of the sides on the ground.
- The box is set aside. The turf is removed from the marked area along with the grass in layers.For these works you will need a sharp shovel. Pieces of turf are placed to the side. They will be useful for the top layer.
- When the hole is dug to the required depth, a knocked down wooden box is installed in it. Sometimes gardeners resort to tricks by additionally insulating the structure. To do this, the sides are lined with pieces of polystyrene foam or polystyrene foam, and the bottom is tightly covered with empty plastic bottles with screwed caps.

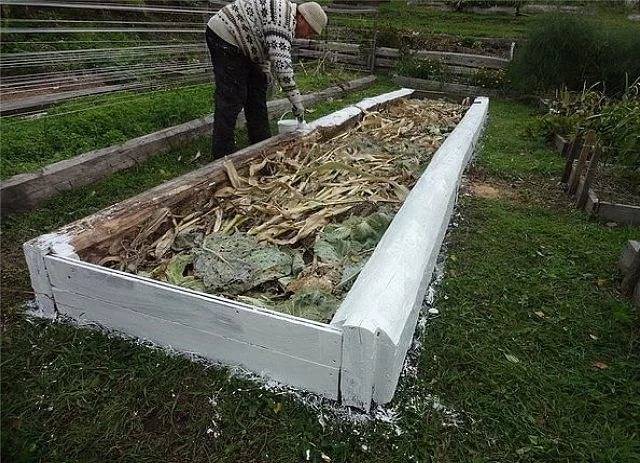
- Next, according to the arrangement of warm beds already discussed, layer-by-layer placement of organic matter is carried out. When all the layers have been laid, the pile is watered generously and then covered with PET film.
- If organic matter was laid in the spring, then after two weeks you can sow garden crops or plant seedlings on it. Immediately after planting, the soil is sprinkled with dark mulch. In spring, the dark surface will be better warmed up by the sun's heat. When the summer heat sets in, light mulch made from sawdust or straw is used for backfilling. The light surface will reflect the scorching rays of the sun, preventing the plant root system from overheating.
The video shows the construction of a warm bed:
Now you know how to create warm beds with your own hands on your summer cottage. This is done the same way in spring or autumn. It’s just that autumn planting is more profitable due to the large amount of fallen leaves and other organic residues.