Content
Many residents of the private sector are engaged in rabbit breeding. Animals are easy to care for if they are kept in a properly equipped cage. It is easier to buy houses for long-eared pets, but such costs will take a long time to pay off. It will be cheaper to make cages for rabbits with your own hands, and after receiving the first profit, you can think about factory designs.
Dimensions and drawings of cells
The size and design of the cages is determined by the number of animals, as well as the purpose of the livestock, that is, rabbits are left for fattening, for breeding, etc. Let's look at the parameters by which cages are made for different groups of animals:
- The rabbits separated from the female are kept in a group cage until they are three months old. Moreover, animals are divided into breeding and slaughter animals. A house for young rabbits is made 2–3 m long, 0.6 m high, 1 m wide. Young animals are housed in 6–10 animals. Breeding individuals are grouped with a maximum of 6 heads. The photo shows a group cage with young rabbits.
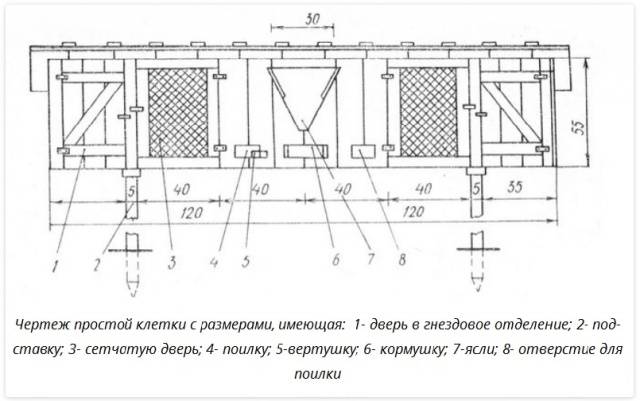
- The following photo shows a diagram of a house with dimensions for two pregnant rabbits. You can also make a single cage with a queen cell. Then its dimensions will be: 1.2x0.7x0.6 m.That is, it turns out to be half of the house shown in the drawing. The queen cell can be made retractable, which is recommended by many rabbit breeders. This design makes it easier to clean the cage after placing the young animals. A queen cell for a female with rabbits is made: length - 40 cm, height - 60 cm, depth - 70 cm. A hole measuring 20x20 cm is cut out on the front wall.
- Now let's look at the size of cages for rabbits that have reached puberty. Adults are kept in one- and two-section structures. The length of the first type of house is 0.8–1.1 m, and the second type is 1.3 m. The width of both types of construction is at least 0.6 m. A single-section cage can accommodate a maximum of 3 pets, and a two-section design is suitable for keeping 5 –6 rabbits.
- Young males are kept in groups until they are three months old. If animals are intended for slaughter, they are simply castrated. Breeding rabbits are placed in single cages measuring 0.7 x 0.7 x 0.6 m. In the photo you can see a detailed drawing with the dimensions of the house for young animals. Attached to the back wall are simple mesh enclosures.
Using the presented drawings of cages for rabbits, you can try to make a similar design at home.
Recommendations for cell construction
Even before the construction of cages for rabbits begins, you need to decide on the location of their installation. On the site, it is advisable to choose a corner without drafts, but it is also better to avoid the south side. In summer, rabbits will get very hot under the sun. It is important to provide a roof that reliably protects from precipitation. On houses it is made mono-pitched, using the cheapest roofing covering.
Building winter houses for rabbits is much more difficult. Firstly, the floor is not made of mesh, but is filled with slats in 15 mm increments. A solid pallet is installed under the floor. It should extend to clear manure. Secondly, you need to take care of saving the offspring in winter. The walls and ceiling of the winter house are insulated with any available thermal insulation. Feeders and drinking bowls are made removable. In severe frosts, food and water will freeze in them. The removable design allows you to bring the drinker and feeder into a warm place to defrost.
Overview of varieties of rabbit cages
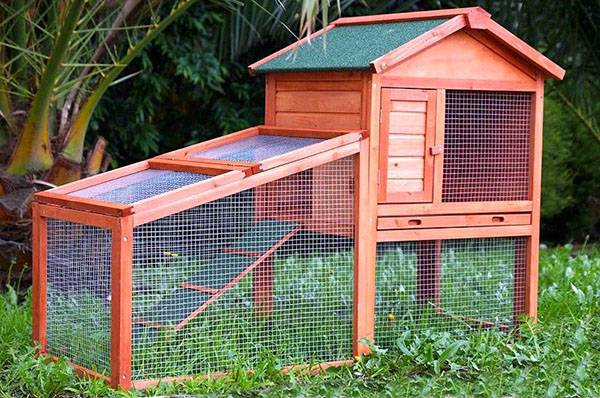
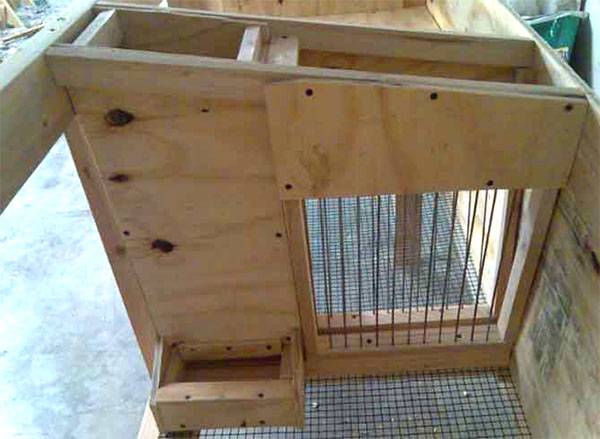
To make it easier to make a rabbit cage with your own hands, let's look at several popular types of design. The photo shows the original solution for a summer house. The structure stands on high legs, and there is a mesh enclosure under and near the house. There are two compartments inside: a queen cell and a feeding area. The rooms are separated by a plywood partition with a hole.
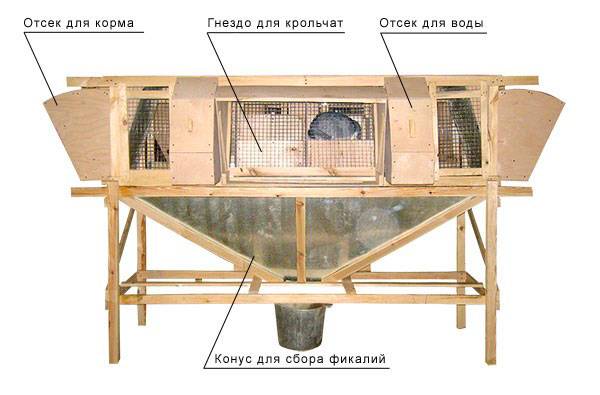
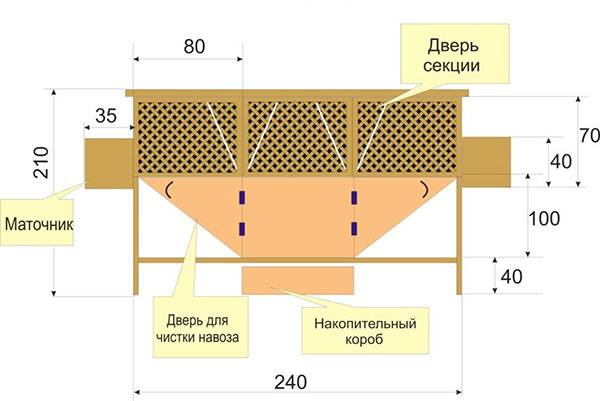
The next photo shows a Mikhailov cage designed for industrial rabbit breeding. The author of the technology provided heating for the queen cell, a ventilation system and other nuances. The special feature is a cone-shaped tray for automatic manure removal. The design can be called a mini-farm, allowing you to engage in rabbit breeding at a professional level.
If someone wants to know how to make a cage for rabbits using Mikhailov’s analogue, they can use a detailed drawing with the indicated dimensions.
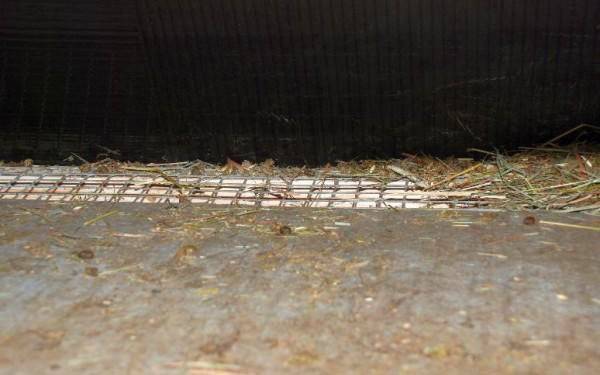
The Zolotukhin cell is no less interesting in its design. Its distinctive feature is the floor design. It is made solid from plywood, boards or flat asbestos-cement slate. Slats and a tray are not used, and a 20 cm wide mesh is installed on the floor only at the back wall of the house. Manure is removed through it. For this to happen automatically, the floor is arranged with a slight slope.
Feeders are placed outside, and they are made to tip over. This design option is due to ease of cleaning. The feeder does not have to be removed, but only needs to be overturned and thoroughly cleaned with a scraper.
Another distinctive feature of the cell is the absence of a queen cell. The author of the technology suggests fencing off the nesting area inside the house with a board 20 cm wide in the summer. The female rabbit herself will build a nest out of hay. Zolotukhin assures that rabbits born in such conditions are healthier and rarely catch infectious diseases. When the kids begin to move independently, the board is removed. There is a lot of free space in the house.
In winter, in such cages they also produce offspring from female rabbits, but the option with a board does not work. Instead of a fence, a wooden queen cell is installed.
In the video, Nikolai Ivanovich Zolotukhin talks about his cages and technology for raising rabbits:
The instructions for making Zolotukhin cells look like this:
- You don't need expensive materials to make a house. You can find most of them at home. So, the frame of the house, doors, and the base of the partition are assembled from timber or thick boards.
- A slope is created on the lower part of the frame by adding a horizontally laid board, after which plywood or flat slate is attached.At the back wall, along its entire length, the floor area is covered with a mesh. The doors where the feeders will hang are also lined with mesh. Only the sash of the queen cell is made solid to prevent drafts and get rid of excess light.
- All wooden frame elements from the inside of the house are covered with sheet metal. It will protect the structure from the sharp teeth of rabbits. A threshold made of a board at least 10 cm wide is nailed to the floor on the side of the queen cell door. It will prevent the babies from falling out of the cage when the door is opened.
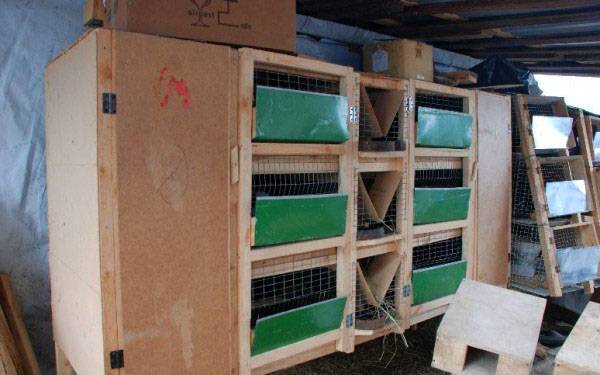
- Zolotukhin cells are made multi-tiered. The manure will be drained through the mesh at the back of the house. To prevent waste from the upper floor from falling onto the cells of the lower level, the rear cladding is made at an angle. Moreover, the slope is maintained only on the lower cells, while the wall of the upper house remains flat.
That's all the secrets of making Zolotukhin's cell. The design is so simple that it can be manufactured and installed on your site.
Self-production of a single-tier cage with a queen cell and a bunker feeder
Now we propose to consider what a step-by-step instruction for a do-it-yourself rabbit cage, equipped with two compartments, looks like:
- The manufacture of the structure begins with the assembly of the frame. To do this, a lower frame is assembled from timber with a cross-section of 50x50 mm. The racks are attached to it, and then the top trim is attached. Once the frame is assembled, a steel mesh is nailed to the bottom frame. Such a floor is made only where there will be a compartment for feeding rabbits. A board is nailed into the queen cell. Here the floor is made continuous without gaps. The optimal size of the mesh cells is 2x2 cm. Coarse mesh material for the floor is not suitable, since the rabbits' feet will fall through and get stuck.
- The side and back walls are made of boards or plywood. A partition is installed to separate the queen cell and the feeding area. The hole can be cut rectangular or round, with a diameter of about 20 cm.
- Next, they move on to the internal arrangement. First, install a cover on the nest. After this, the internal partition of the two compartments is assembled. Here a section for grass is made of steel rods and bunker feeders are installed.
- The top of the structure is covered with plywood. This will be the roof. Sashes with handles are attached to the feeders. On the front side of the house they place a mesh door on the feeding compartment and a solid flap for the queen cell.
- If you plan to install the cage outdoors, the plywood roof must be protected with a waterproof roofing covering. It is imperative to provide a slope towards the rear wall so that precipitation does not accumulate on the roof.
The advantage of the design lies in the ease of manufacture and the provided spacious feeder. The bunker is designed for 6 kg of feed, which saves the owner from daily attachment to the rabbits.
Making your own multi-tiered cage
The instructions for manufacturing a multi-tier structure differ only in the assembly of the frame:
- The process begins with the assembly of the lower frame. Vertical posts are attached to it. Their length depends on the number of tiers. Moreover, a minimum of 15 cm is added to the height of each house. The margin is needed to create a gap where the pallet will be inserted. The last assembly in the frame structure is the top trim.
- Transverse jumpers are attached between the posts. They will support the houses of each tier. Legs are attached to the bottom of the frame made of thick timber or pieces of steel pipe. They must raise the cage from the ground to a height of at least 40 cm.
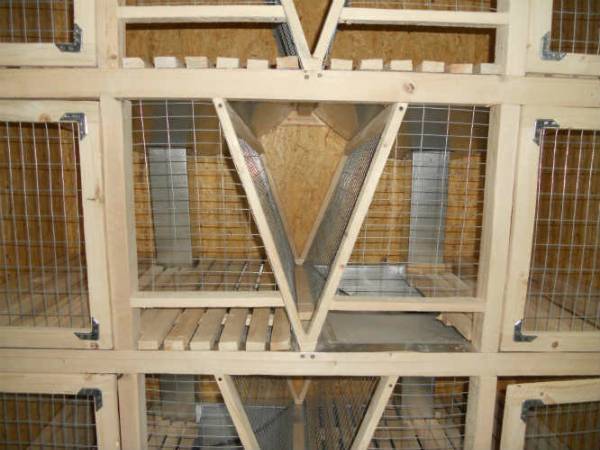
- The houses will be divided into several sections not by simple partitions, but by a V-shaped grass feeder. Its frame is assembled from timber. For cladding, use a coarse mesh or attach metal rods.
- Making the queen cell, attaching the doors and other internal arrangements are carried out in the same way as they did in a single-tier cage. When the structure is completely completed, a galvanized pallet is placed under each tier. It needs to be secured with a slope to make it more convenient to rake out manure.
Multi-tiered cages are convenient because, if necessary, they can be disassembled into separate modules, the frame can be moved to another place, and the house can be reassembled again.
The video demonstrates the cell manufacturing process:
As practice shows, multi-tiered cages are more often popular in households and farms. This is due to space saving. However, it is not advisable to build a structure of more than three levels due to the difficulty of maintaining it.

