Content
- 1 The hazel grouse has bloomed, what to do next?
- 2 Do I need to dig up hazel grouse after flowering every year?
- 3 When and how to prune hazel grouse after flowering
- 4 When to dig up fritillary bulbs after flowering
- 5 Proper digging of hazel grouse
- 6 How and where to store hazel grouse bulbs before planting
- 7 Conclusion
After flowering, hazel grouse require certain care, including a set of measures. This also includes digging up the bulbs and then storing them until they are planted again. Some gardeners resort to this measure annually, others at certain intervals.
The hazel grouse has bloomed, what to do next?
When caring for fritillary flowers after flowering, first determine whether seeds are needed. If you plan to collect them, then wait until they ripen. In this case, the above-ground part of the plant is not touched. The disadvantage of this option is that there will be no flowering next summer.
If seed collection is not required, then after the perennial buds wither, the flower stalks are cut off. In order for the bulb to form better, apply potassium-phosphorus fertilizer. Superphosphate and potassium sulfate are added at a rate of 10-15 g per 1 m².
Fertilizers after flowering can be used in dry form, but be sure to combine fertilizing with watering. Additionally, such preparation improves the protective functions of the plant.
If after the flowering of a perennial there is still a dry period, then even if the above-ground part dies off, watering continues. It is enough to moisten the soil once every 2-3 weeks.
In addition to all the listed activities, after flowering hazel grouse, cut off the above-ground part when it dries, and dig up the bulbs. Some gardeners refuse the latter measure.

Digging up a perennial does not mean the need for replanting - it can be returned to its original place
Do I need to dig up hazel grouse after flowering every year?
It is not necessary to dig up hazel grouse every year after flowering. If the variety has small bulbs, then you can grow it in one place for several years. Planting will be needed only when the bushes become thicker.
Digging up imperial hazel grouse is recommended every year. Otherwise, the plant’s bulbs will become smaller, and therefore the flowering will not be as lush.
It is allowed to dig up perennials once every two years. This is especially appropriate when children are needed. Due to their small size, they are easy to damage or lose when digging. It is better not to touch such bulbs for 1-2 years, and to prevent diseases and pests, ensure proper care, treatment with fungicides and insecticides.
When deciding how often to dig up hazel grouse after flowering, you need to understand the benefits of this action. When the bulbs are dormant, they are more susceptible to diseases and pest damage. Digging them up followed by processing and proper storage reduces the risk of such problems. This is especially important for large bulbs like the imperial hazel grouse.
Another important reason to dig up a perennial after flowering is the gradual burying of the rhizome into the ground. This increases germination time at the beginning of the season and increases the risk of rotting.
Digging up a perennial after flowering is necessary when replanting is required. If there are diseased plants or signs of rot, then it is effective to treat the vacated area with suitable preparations.
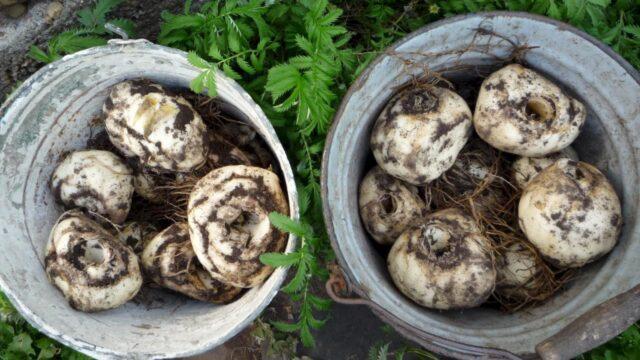
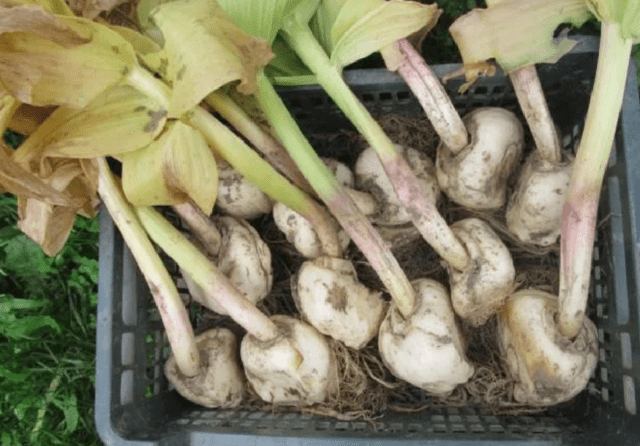
In the hazel grouse bulbs dug up after flowering, a hole is visible - a shoot with buds came out from here, by the fall sprouts will appear here
Digging after flowering is also necessary for propagation of the perennial. From an adult bulb you can get several replacement bulbs. This option is better than propagation by seeds, since you do not have to wait long for the first flowering.
When and how to prune hazel grouse after flowering
It is not necessary to remove hazel grouse immediately after flowering. First, only shoots with faded buds are pruned. They do this so that after flowering the plant does not waste nutrients that are necessary for the bulbs.
The next pruning is carried out when the above-ground part dries out. At the same time, be sure to mark the location of the bulbs with pegs if they will be dug up later. It is recommended to leave a stump of about 5-10 cm high from the stem. This will make the work easier when digging the underground part. There is no need to mark the location on the surface.
When pruning, it is important to remember personal protection. Many types of hazel grouse are poisonous and can cause skin irritation and an allergic reaction.
Another important measure when pruning is disinfection of the tool. It is better to treat it after each plant. It is convenient to do this by soaking a small sponge or rag with alcohol or another disinfectant.
When to dig up fritillary bulbs after flowering
The timing of digging up hazel grouse after flowering depends on the specific variety and climate in the growing region. You need to focus on the condition of the aboveground part of the plant. It is this that indicates that the bulbs have entered a dormant state. This is indicated by the falling of the petals after flowering and the yellowing of the green parts of the plant.
Another sign of the hibernation period is the drying out of the perennial roots. This can be checked by carefully digging up the soil near the hazel grouse.
Harvesting time usually occurs in June-July. You should not wait for the aerial part of the imperial hazel grouse to dry completely. Its large bulbs during the dormant period without digging are more susceptible to rot.
Hazel grouse bulbs emit an unpleasant odor - this should be taken into account when choosing a storage location
Proper digging of hazel grouse
The perennial tubers are too fragile, so they need to be dug up very carefully after flowering. Work should be planned for dry days. The algorithm is like this:
- Trim off the above-ground part if this has not been done before.
- Step back from the rest of the stem or marking peg 15-25 cm to the sides and carefully dig up the soil. It is better to use a pitchfork for this instead of a shovel.
- Pull the bulb out of the ground, holding the bottom of the stem.
- Carefully peel the removed tubers.
- Use a deep scoop to check the soil for any separated seedlings.
Even with all precautions, there is a risk of accidental damage to the bulbs. You should not throw them away if part of the bottom is saved - they will not die if properly processed and stored. Sprouts will appear next year.
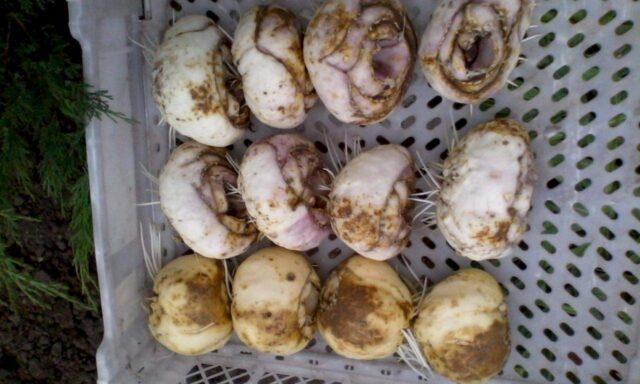
The outer shell is removed from the hazel grouse bulbs and then carefully examined. If there is rot or signs of a fungal disease, the affected area is cut back to healthy tissue, including a little of them as well.Be sure to disinfect these areas. You can use brilliant green or iodine.
How and where to store hazel grouse bulbs before planting
To preserve hazel grouse bulbs until the next planting, they must first be properly prepared. In addition to cleaning the affected areas and disinfecting the sections, this implies the following measures:
- Drying. The dug up hazel grouse are laid out in a warm and well-ventilated place without access to sunlight. The process takes approximately a week. The tubers can be dried in the sun for the first 2-4 hours.
- Separation of roots and dried stems. This should be done carefully, as this will create a hole.
- Disinfection. Prepare a solution of a fungicide (Fitosporin is effective) or potassium permanganate (0.2 mg per 1 liter of water), and immerse the tubers in it for half an hour. This treatment is disease prevention.
- Drying.
To store hazel grouse dug out after flowering, choose a dry place with good ventilation. Optimum temperature from 25 °C. Cellars and basements are not suitable for this.
Correct temperature conditions and low humidity are important for the preservation of bulbs and the formation of flower buds
Dug up, processed and well-dried hazel grouse are laid out in suitable containers:
- boxes made of wood or plastic;
- cardboard boxes.
It is recommended to lay out the hazel grouse bulbs in the selected container so that they do not touch each other. If the bottom of the containers is not perforated, then it is better to fill it with dry river sand. Its layer will improve the safety of the material and absorb excess moisture.
When the stem is removed, the hole in the tuber becomes through or funnel-shaped.The first option is more attractive, since the absence of a partition prevents moisture from accumulating inside. Such tubers can be placed bottom down. If after removing the stem the hole turns out to be blind, then the bulbs are laid slightly on their side. Otherwise, moisture will accumulate inside, which can lead to rotting.
Hazel grouse must be systematically inspected during storage. This is especially important when traces of rot were discovered and cleaned up during cleaning.

When new roots and shoots appear, the hazel grouse are ready for planting in open ground
Conditions change if there are no plans to plant the perennial back into open ground in the same season. Then the material must be saved until next year. The room chosen for it is dry, but already cool. If there are only a few tubers, you can place them in the refrigerator. The bulbs are stored in a container filled with moist peat.
Conclusion
After flowering, hazel grouse are dug up for protection from diseases and pests and reproduction. The tubers must be disinfected and dried, kept dry and warm. The shelf life is short, since in the same year the perennial is planted again in open ground.