Content
Grafting a melon onto a pumpkin is no more complicated than the procedure carried out with trees. Even some of the methods are similar. The difference is the more fragile structure of the stem of the rootstock and scion. To get a good result, you must adhere to the rules and be careful.
Why do you need to graft a melon?
Melon is considered a heat-loving crop. The plant is slightly capricious and does not tolerate temperature fluctuations. In regions with cold or changeable climates, it is impossible to obtain a good harvest. Breeders have developed many cold-resistant varieties, but the problem is not 100% solved. The fruits grow small, less aromatic and sweet.
Grafting helps preserve the varietal characteristics of a heat-loving crop growing in a cold region to the maximum. Melon becomes resistant to cold. On foreign roots it adapts better to the soil. The fruit grows with characteristic varietal characteristics, but in taste it is slightly inferior to melon grown in the southern regions.
Grafting methods
Gardeners use three popular methods for grafting:
- Approach method considered simple, suitable for inexperienced gardeners. The technology involves growing the scion and rootstock in one pot close to each other. The skin of the plant stems is cut off from the side, connected and wrapped with tape. The top of the rootstock is cut off after about a week, when the plant sections have grown together. The native melon root is cut off during transplantation. The plant continues to grow with the rhizome of the rootstock.
- Split method used if the rootstock has a full-bodied stem. The melon is cut at the root and the stem is sharpened with a wedge. The top is cut off from the rootstock, the stem is cut 2 cm deep with a knife, the scion is inserted with a wedge, and wrapped with tape.
- Grafting method into the center of the trunk Suitable for hollow-stemmed rootstock. The procedure is simple and accessible to a beginning gardener. To graft, the top of the rootstock is cut off, leaving a stump up to 2 cm high above the ground. The cut top of the melon is inserted into the hollow stem and wrapped with tape.
Grafting using the cleft method is considered the most difficult. There are other ways, for example, through a side incision. The method is also called tongue grafting and is a bit like rapprochement.
What crops are suitable as a rootstock?
Plants from the related Pumpkin family are chosen as a rootstock. The gardener individually determines what is best adapted to the local conditions. Melon is very capricious when it comes to choosing a rootstock, so three crops are often used for grafting:
- It is easiest to graft a melon onto a pumpkin due to the presence of an air cavity in the rootstock stem. Once the scion has been fused, ideal conditions are created for rapid root growth. You can graft onto a pumpkin using any of the methods discussed above.The new plant is resistant to cold, pests and diseases.
- The melon is grafted onto lagenaria in the center of the trunk. The rootstock and scion grow together with difficulty. If the graft does not take root immediately, the plant will dry out. Often the sun destroys the crop. The taste of melon on legenaria is much worse if we compare the result where pumpkin is the rootstock.
- A good option is to graft melon onto zucchini or squash. The new plant adapts better to the soil, temperature changes, and bears fruit well in cold regions
Experienced gardeners practice grafting three plants at the same time. If you combine a tomato, melon and zucchini, you will get tasty fruits, but the plant itself will be susceptible to tomato diseases.
What can be grafted onto a melon?
In rare cases, the top of an adult pumpkin or gourd is grafted onto a melon. To achieve good results, the rootstock is grown from large seeds to produce thick stems. Seedlings are provided with maximum light. If the stems of the rootstock are thin, the scion will not take root.
Preparatory activities
To give a good result when grafting a melon onto a pumpkin, you need to properly prepare the scion and rootstock. At the time of the procedure, instruments and auxiliary materials must be ready.
Recommended timing
The optimal time for vaccination is considered to be the end of April or the beginning of May. At this point, the seedlings should have at least one full leaf.
Preparation of materials and tools
The materials you will need are tape for wrapping the grafting site, a glass jar or a plastic bottle with transparent walls.
The tool you need is a sharp gardener's knife, but it is more convenient to cut thin stems with a blade. At the time of use, the instrument must be disinfected.
Preparation of scion and rootstock
From mid-April, one melon seed and the selected rootstock are sown in cups. The seedlings are watered abundantly and provided with lighting. Seedlings need a large amount of water before grafting. The procedure begins after approximately 11 days.
How to vaccinate correctly
Pumpkin is considered the best universal rootstock. Vaccination can be carried out using any existing method.
More information is provided in the video on how to graft a melon onto a pumpkin:
How to graft a melon into the center of a pumpkin sprout
At the time of grafting, the plants should have full leaves. Melon is sown 3 days earlier than pumpkin due to the slow development of the crop. When the seedlings grow, prepare a disinfected blade and 2 cm wide tape for wrapping. The further process requires the following steps:
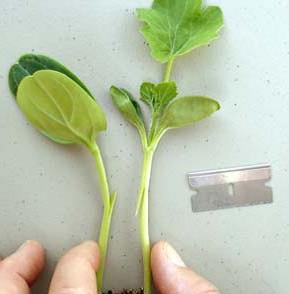
- Place a glass with a pumpkin sprout so that one leaf is on the opposite side of the cut. Cut off the top and second leaf of the pumpkin. In place of the removed top, a blade is used to cut the stem lengthwise to a depth of 2 cm. Below the cut, the stem is wrapped with tape and the free end is left hanging.
- The growing melon is cut down to the base of the root with a blade. The length of the scion should be from 2.5 to 3 cm. From the side of the cotyledon leaves, the skin is cut off from the stem.
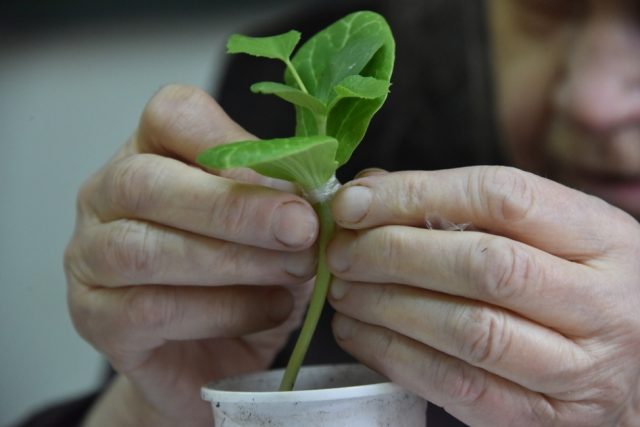
- Gently push the cut apart on the pumpkin by pressing with your fingers and insert the scion with the stripped stem. The pointed tip should sink into the rootstock groove all the way to the base. In addition, it is necessary to ensure that the cotyledon leaves of the connected plants are parallel to each other.
- The junction is squeezed with your fingers. The stem is wrapped with the hanging end of the tape wound below the cut.
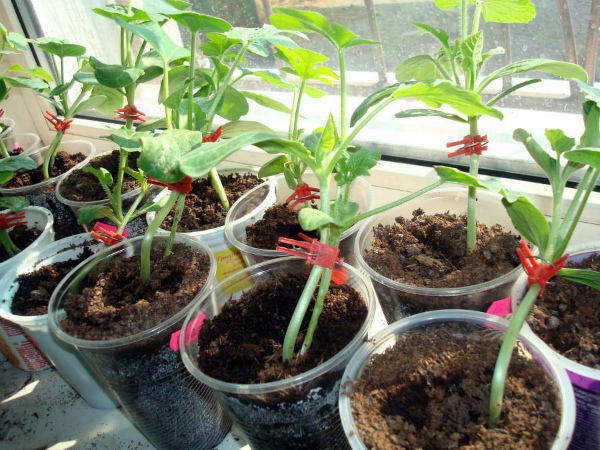
- To ensure rapid fusion of stems, the plant is covered with a glass jar.A clear plastic bottle with a cut off neck will do.
An optimal microclimate is formed under the container. Every day the jar or bottle is removed for 2 minutes to air. If the melon has taken root, the stem will begin to grow on the eighth day. After two weeks, remove the shelter from the jar.
Method of bringing together the scion and rootstock
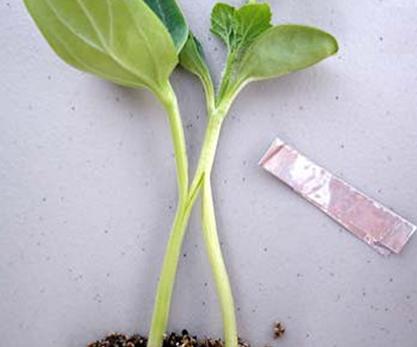
In terms of survival rate, the rapprochement method is considered the best. Pumpkin and melon seedlings should grow in the same container close to each other. When one adult leaf appears, begin grafting:
- The stems of the seedlings are lightly squeezed with your fingers. A cut is made at the point of contact between both plants. The peel is removed to a thickness of about 2 mm. The stems are squeezed again with your fingers, and the exact coincidence of the cut boundaries is checked. If everything comes together, the two plants at the grafting point are tied together with tape.
- Both sprouts continue to receive nutrients through their roots, eliminating the need to cover them with a jar. After a week, the melon stem near the root is strongly crushed with your fingers. The damage will cause the scion to feed on the pumpkin juices. The procedure is repeated until the damaged stem near the root dries out. At this point it is cut.
The top of the pumpkin is removed after the scion has completely engrafted. Only two cotyledons and one full leaf are left on a small section of the stem.
Side cut
The lateral incision method is also called tongue grafting. The technology resembles convergence, but some nuances differ:
- The cut on the plant stems at the points of contact is not made completely, but tongues 2 cm long are left. They should be located in different directions, and when connected, form a lock.For example, a melon is cut from the bottom up, and a pumpkin is cut from the top down.
- The resulting locking connection is folded together. The stems are tied with tape. The paired seedling is tied to a peg for stability.
The further courtship procedure is the same as with the approach method.
How to graft a melon onto a pumpkin in a split
Gardeners practice the simplest grafting method on pears, apple trees and other trees. In a similar way, melon is grafted onto a pumpkin in a split, only a rootstock variety with a full-bodied stem is used.
At two weeks of age, the top of the pumpkin is cut off, leaving a stump with 4 cm of the subcotyledon. The stem is split with a blade to a depth of 2 cm. The top 4 cm long with a blossoming young leaf and two cotyledon leaves is cut off from the scion. The bottom of the cut is sharpened with a wedge. The melon is inserted into the slot of the pumpkin stem and tied with a ribbon. For better establishment, you can cover the plant with a jar.
Caring for plants after grafting
Vegetable growers post on the Internet many videos of grafting melons onto pumpkins and growing plants after the procedure. Everyone has their own secrets, but the principle is the same. Immediately after grafting, mulch the soil with raw sawdust. For the first week, maintain humidity at 90% and temperature + 25 OC. Plants are shaded from the sun, ventilated daily for 2 minutes if they are covered with a jar.
If grafting is successful, the melon will begin to grow in about a week. The air temperature is reduced to + 20 OC. At night you can reduce it by another two degrees. 3-4 days before planting in the ground, the plants are fed with mineral complexes and hardened. After planting, the melons are given the usual care.
Conclusion
Grafting melon onto pumpkin is guaranteed to give positive results with experience.Initially, you should not try to graft all the crops. If unsuccessful, you may be left without a harvest.
