Content
Having your own wind generator is very profitable. Firstly, a person receives free electricity. Secondly, electricity can be obtained in places remote from civilization, where there are no power lines. A windmill is a device designed to generate kinetic wind energy. Many craftsmen have learned to assemble a vertical wind generator with their own hands, and now we will find out how this is done.
Design and types of wind turbines
Wind generators have many names, but it is more correct to call them a wind power plant. A wind farm consists of electrical equipment and a mechanical structure - a wind turbine, which are interconnected into a single system. An electrical installation helps turn wind into a source of energy.
There are many types of wind generators, but according to the location of the working axis they are conventionally divided into two groups:
- Windmills with a horizontal axis of rotation are the most common. The electrical installation is characterized by high efficiency. In addition, the mechanism itself is better able to withstand hurricanes, and in light winds the rotor starts faster. Horizontal wind generators have easier power control.

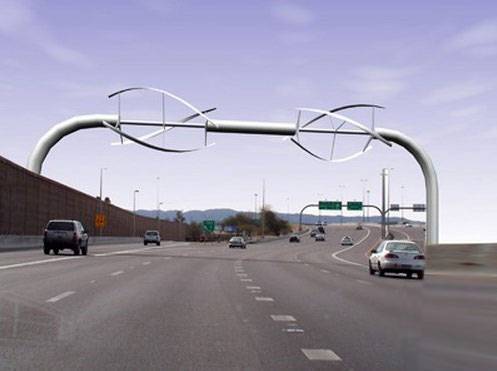
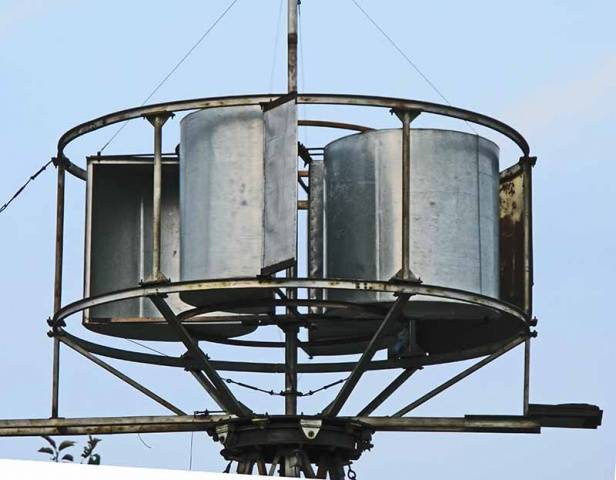
- Windmills with a vertical axis of rotation are able to operate even at low wind speeds. Turbines are quiet and easier to manufacture, so most often they are installed by craftsmen in their yard.However, the design feature of a vertical windmill allows it to be installed only low from the ground. Because of this, the efficiency of the electrical installation is greatly reduced.
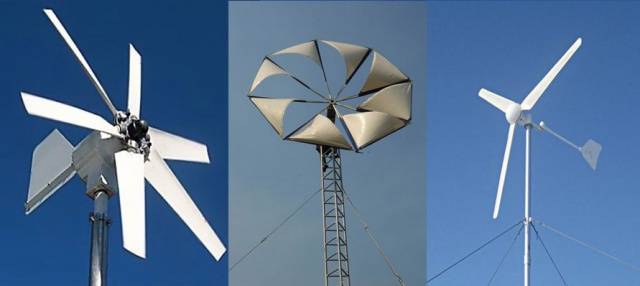
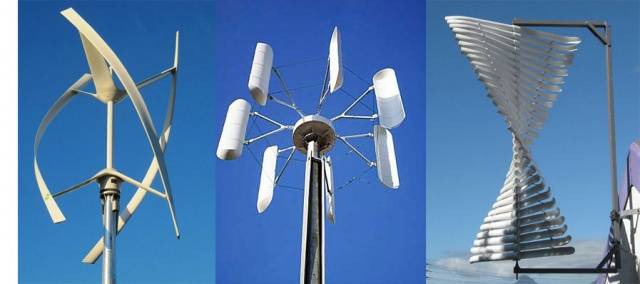
Wind generators differ according to the type of impeller:
- Propeller or wing models are equipped with blades that are perpendicular to the working horizontal shaft.
- Carousel models are also called rotary. They are typical for vertical wind turbines.
- Drum models similarly have a vertical working axis.
To generate kinetic wind energy on an industrial scale, propeller wind generators are usually used. Drum and carousel models are larger in size and have a less efficient mechanism.
All wind turbines can be equipped with a multiplier. This gearbox creates a lot of noise during operation. Multipliers are usually not used in home wind turbines.
Wind turbine operating principle
It is worth noting that the principle of operation of a wind generator is the same, regardless of its design and appearance. Energy generation begins from the moment the windmill blades rotate. At this time, a magnetic field is created between the rotor and stator of the generator. It serves as a source of energy that generates electricity.
So, as we found out, a wind generator consists of two main parts: a rotating mechanism with blades and a generator. Now about the work of the animator. This gearbox is installed on a windmill to increase the speed of the working shaft.
When the generator rotor rotates, alternating current is generated, that is, three phases come out. The generated energy reaches the controller, and from it goes to the battery.In this chain there is another important device - an inverter. It converts the current to stable parameters and supplies it to the consumer through the network.
Windmill industrial craft 2
In the field of wind energy, the industrial craft 2 kinetic wind generator, which has a modified unit for generating wind energy, is very famous. To calculate the power of an electrical installation, the sum of the speeds of its working parts is multiplied by 0.1. The size of the working area is determined by the dimensions of the rotor. During rotation it produces kinetic energy kU rather than electrical energy EU.
The rotation of the blades depends on gusts of wind. The most optimal speed is observed at an altitude of 160–162 m. A thunderstorm increases the wind speed by 50%, and simple rain - up to 20%.
The rotors of the industrial craft 2 wind generator differ in the dimensions and material of the blades, as well as the maximum wind force values at which they are capable of operating:
- wooden rotor with 5x5 blades is designed for a wind speed range from 10 to 60 MCW;
an iron rotor with 7x7 blades is designed for a speed range from 14 to 75 MCW; - steel rotor with 9x9 blades is designed for a range of air flow rates from 17 to 90 MCW;
- The carbon fiber rotor with 11x11 blades is designed for a range of air flow rates from 20 to 110 MCW.
Industrial Craft 2 kinetic wind generators are not placed close together on the same level with their backs to each other.
Self-production of a vertical wind generator
A windmill with a vertical shaft is the easiest to make yourself. The blades are made from any material, the main thing is that it is resistant to moisture and the sun, and is also lightweight.For the blades of a home wind generator, you can use PVC pipe, used in sewer construction. This material meets all of the above requirements. Four blades 70 cm high are cut out of plastic, plus two of the same ones are made of galvanized steel. The tin elements are shaped into a semicircle and then fixed on both sides of the pipe. The remaining blades are mounted at the same distance in a circle. The radius of rotation of such a windmill will be 69 cm.
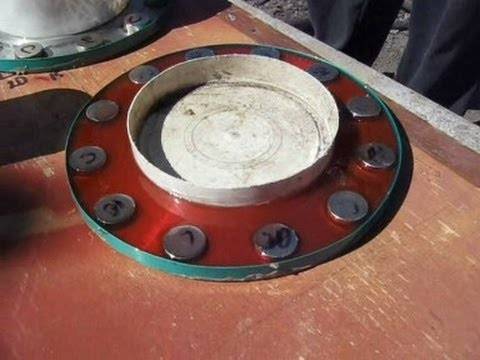
The next stage is rotor assembly. You will need magnets here. First, take two ferrite disks with a diameter of 23 cm. Using glue, six neodymium magnets are attached to one disk. With a magnet diameter of 165 cm, an angle of 60 is formed between themO. If these elements are smaller, then their number is increased. The magnets are not simply glued haphazardly, but the polarity is changed one by one. Ferrite magnets are attached to the second disk in a similar manner. The entire structure is generously filled with glue.
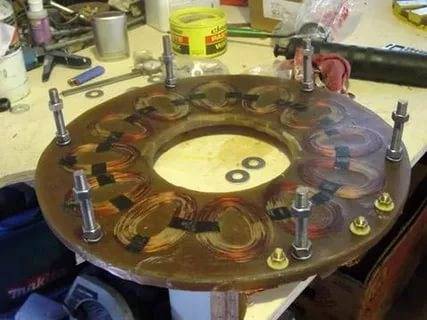
The most difficult thing is making the stator. You need to find a copper wire 1 mm thick and make nine coils from it. Each element must contain exactly 60 turns. Next, the stator electrical circuit is assembled from the finished coils. All nine of them are laid out in a circle. First, connect the ends of the first and fourth coils. Next, connect the second free end of the fourth to the output of the seventh coil. The result was a single-phase element of three coils. The second phase circuit is assembled from the next three coils in order, starting with the second element. The last phase to be assembled in the same way is the third phase, starting from the third coil.
To attach the circuit, a shape is cut out of plywood. Fiberglass is placed on top of it, and a circuit of nine coils is laid out on it. All this is poured with glue, after which it is left until completely hardened.No earlier than a day later, the rotor and stator can be connected. First, the rotor is placed with the magnets up, the stator is placed on it, and the second disk is placed on top with the magnets down. The connection principle can be seen in the photo.

Now it's time to assemble the wind generator. Its entire circuit will consist of an impeller with blades, a battery and an inverter. To increase torque, it is advisable to install a gearbox. Installation work has the following order:
- A durable mast is welded from a steel angle, pipes or profile. In height, it should raise the impeller with blades above the roof ridge.
- The foundation is poured under the mast. Reinforcement is required and anchors protruding from the concrete are provided.
- Next, the impeller with the generator is fixed to the mast.
- After installing the mast on the foundation, it is attached to anchors, after which it is reinforced with steel braces. For these purposes, a cable or steel rod 10–12 mm thick is suitable.
When the mechanical part of the wind generator is ready, they begin to assemble the electrical circuit. The generator output will provide three-phase current. To obtain a constant voltage, a rectifier made of diodes is installed in the circuit. Battery charging is controlled through a car relay. The circuit ends with an inverter, from which the required 220 volts are supplied to the home network.
The output power of such a wind generator depends on the wind speed. For example, at 5 m/s the electrical installation will produce about 15 W, and at 18 m/s you can get an output of up to 163 W. To increase productivity, the windmill mast is extended to 26 m. At this height, the wind speed is 30% higher, which means that the electricity generated is approximately one and a half times more.
The video shows the assembly of a generator for a windmill:
Assembling a wind generator is a complex matter. You need to know the basics of electrical engineering, be able to read schematics and use a soldering iron.